.Please follow the instructions below to integrate our iOS SDK in your app.
1. Implementation
a. Prerequisites
Our SDK supports iOS versions 8.0+.
b. Integrating the SDK
- Download the archive linked here, extract the flies from the archive, and drag and drop the Personaly.framework file to your project.
-
Navigate to Project Settings -> General -> Embedded Binaries -> tap + -> and choose Personaly.framework.
- Navigate to Project Settings -> Build Phases -> tap + -> New Run Script Phase and paste the following code in the script text field:
bash "${BUILT_PRODUCTS_DIR}/${FRAMEWORKS_FOLDER_PATH}/Personaly.framework/strip-frameworks.sh"
This step is required to work around an App Store submission bug when archiving universal binaries.
- For Objective C projects Only: Navigate to Project Settings -> Build Settings -> Always Embed Swift Standard Libraries -> and choose Yes
- At the top of your AppDelegate add the following:
Swift

import Personaly
Objective C #import <Personaly/Personaly.h>
- Build your project.
c. Initializing the SDK
The APP_ID key can be found on our dashboard after you’ve finished setting up a new app. You can also pass additional parameters like userID, age, gender or date of birth. The userID should be unique and defined for the current user.
-
In didFinishLaunchingWithOptions of your AppDelegate, call the following:
Swift

let params:[String: Any] = [ Personaly.userIDKey: "USER_ID",
                             Personaly.ageKey: 19,
                             Personaly.genderKey: "male",
                             Personaly.dateOfBirthdayKey: Date() ]

Personaly.configure(withAppID: "APP_ID", parameters: params, completion: { success, error in

})
Objective C NSDictionary *params = @{ [Personaly userIDKey]: @"USER_ID", [Personaly ageKey]: @(19), [Personaly genderKey]: @"male", [Personaly dateOfBirthdayKey]: [NSDate new] }; [Personaly configureWithAppID:@"APP_ID" parameters:params queue:dispatch_get_main_queue() completion:^(BOOL success, NSError * _Nullable error) { }]; - Build and run your project. If the project was built successfully, you’ll see the following in the Xcode console:
PERSONALY LOG: Personaly framework successfully initialized!
d. Defining Callbacks
Every SDK function has a callback closure (block in Objective C) to notify when a function has been executed. The callback will return success or error. Success is a boolean value, indicating if the function was executed without errors or not. Error contains common errors or ones from the list below.
Swift

Personaly.someFunction { success, error in

}
Objective C

[Personaly someFunction:^(BOOL success, NSError * _Nullable error ) {


}];
e. Setting up the delegate
In order to get notified about the different phases of an ad’s life cycle, our SDK includes the delegate property which implements the PersonalyDelegate protocol.
Set delegate:
Swift

Personaly.delegate = self
Objective C

[Personaly setDelegate:self];
Implement the delegate functions:
Swift

//MARK:- PersonalyDelegate

func didConfigure() {

}

func didFailConfigure(with error: Error?) {

}

func didPrecache(forPlacement placementID: String) {

}


func didFailPrecache(forPlacement placementID: String, error: Error?) {

}

func didReceiveReward(forPlacement placementID: String, amount: Int) {

}

func didReceiveClick(forPlacement placementID: String) {

}
Objective C

#pragma mark - PersonalyDelegate

- (void) didConfigure {

}

- (void) didFailConfigure:(NSError *)error {

}

- (void) didPrecacheForPlacement:(NSString *)placementID {

}

- (void) didFailPrecacheForPlacement:(NSString *)placementID error:(NSError *)error {

}

- (void) didReceiveRewardForPlacement:(NSString *)placementID amount:(NSInteger)amount {

}

- (void) didReceiveClickForPlacement:(NSString *)placementID {

}
f. Error codes
The SDK has a PersonalyError enum that helps to identify an error and understand what’s wrong. The error can be received inside the callback closure of each of the SDK’s functions.
enum PersonalyError: Error, LocalizedError, CustomNSError {

 // The SDK is not configured. Configurethe SDK before using its functions
 case notConfigured // Error code = 1

 // Internal SDK error
 case internalError // Error code = 2

 // The device has no Internet connection
 case noInternetConnection // Error code = 3

 // The SDK has no precached ads to show. You need to precache ads before attempting to display them.
 case noPrecachedDataToShow // Error code = 4

 // The called function is currently in progress, you must wait until it is executed before you can call it again.
 case functionInProgress // Error code = 5
}
PersonalyError enum conforms LocalizedError and CustomNSError protocols, allowing usage of these functions:
- errorCode // To get the error code.
- errorDomain // Static getter. Returns the string “com.personaly”.
-
errorDescription // To get an error description.
g. Auto-caching
The SDK pre-caches ads for all available placements just after initializing. The SDK also auto pre-caches the next ad for Rewarded Moment/Interstitial placements, just after displaying an ad. However, you can disable this behavior by setting the autoCaching propetry to false and pre-cache manually instead (not recommended):
Swift

Personaly.autoCaching = false
Objective C

[Personaly setAutoCaching:NO];
2. Rewarded Moments
a. Prerequisites
Before you start working with the ad unit, please make sure that the SDK is integrated and initialized as described here.
b. Ad Unit Implementation
To show a Rewarded Moment (Rewarded Video or a Rewarded Playable Ad) without a delay, our SDK has to pre-cache the ad first.
By default the ad is auto pre-cached. However, if you disable auto-caching you will have to manually pre-cache the ad. Pre-caching can be done for each separate PlacementID. The PlacementID key can be found in our dashboard under the Rewarded Moment tab in the ad setting page.
Swift

Personaly.precacheCampaigns(forPlacement: placementID) { success, error in

}
Objective C

[Personaly precacheCampaignsForPlacement:placementID queue:nil completion:^(BOOL success, NSError * _Nullable error ) {

}];
Rewarded Moments have relatively large file sizes, so we recommend pre-caching as early as possible.
Our SDK has the ability to pre-cache ads for multiple Placement IDs, but only one ad per PlacementID at a time.
c. Displaying an ad
First, ensure that an ad is loaded in the didPrecache(forPlacement placementID: String) function of PersonalyDelegate, or check it manually with the following code:
Swift

let isReady = Personaly.isCampaignReady(placementID: placementID)
Objective C

BOOL isReady = [Personaly isCampaignReadyWithPlacementID:placementID];
When pre-caching is finished, an ad should be ready to be displayed.
Swift

Personaly.showCampaign(forPlacement: placementID, serverParameter: nil, completion: { success, error in

})
Objective C

[Personaly showCampaignForPlacement:placementID serverParameter:nil completion:^(BOOL success, NSError * _Nullable error) {

}];
To check that an ad hasn’t reached its cap, use the following method:
Swift

Personaly.canView(forPlacement: placementID) { success, error in

}
Objective C

[Personaly canViewForPlacement:placementID queue:nil completion:^(BOOL succuess, NSError * _Nullable error) {

}];
A new ad can be shown if the previous ad was closed and is not currently being displayed.
d. Rewarding your user
When using Rewarded Moments, you have the ability to configure your postback method: Server to server or Client Side. When choosing the Client Side method, please implement PersonalyDelegate:
Set delegate:
Swift

Personaly.delegate = self
Objective C

[Personaly setDelegate:self];
Implement the delegate function:
Swift

//MARK:- PersonalyDelegate

func didReceiveReward(forPlacement placementID: String, amount: Int) {

}
Objective C

#pragma mark - PersonalyDelegate

- (void) didReceiveRewardForPlacement:(NSString *)placementID amount:(NSInteger)amount {

}
3. Interactive Moments
a. Prerequisites
Before you start working with the ad unit, please make sure that the SDK is integrated and initialized as described here.
b. Ad Unit Implementation
To show an Interactive Moment (Video or a Playable Ad) without a delay, our SDK has to pre-cache the ad first.
By default the ad is auto precached. However if you disable auto-caching you will have to manually pre-cache the ad. Pre-caching can be done for each separate PlacementID. The PlacementID key can be found in our dashboard under the Interstitial tab in the ad setting page.
Swift

Personaly.precacheCampaigns(forPlacement: placementID) { success, error in

}
Objective C

[Personaly precacheCampaignsForPlacement:placementID queue:nil completion:^(BOOL success, NSError * _Nullable error ) {


}];
Interactive Moments have relatively large file sizes, so we recommend pre-caching as early as possible.
Our SDK has the ability to pre-cache ads for multiple PlacementIDs, but only one ad per PlacementID at a time.
c. Displaying an ad
First, ensure that an ad is loaded in the didPrecache(forPlacement placementID: String) function of PersonalyDelegate, or check it manually with the following code:
let isReady = Personaly.isCampaignReady(placementID: placementID)When pre-caching is finished, an ad should be ready to be displayed.
Swift

Personaly.showCampaign(forPlacement: placementID, serverParameter: nil, completion: { success, error in

})
Objective C

[Personaly showCampaignForPlacement:placementID serverParameter:nil completion:^(BOOL success, NSError * _Nullable error) {

}];
A new ad can be shown if the previous ad was closed and is not currently being displayed.
To check that an ad hasn’t reached its cap, use the following method:
Swift

Personaly.canView(forPlacement: placementID) { success, error in

}
Objective C

[Personaly canViewForPlacement:placementID queue:nil completion:^(BOOL succuess, NSError * _Nullable error) {

}];
4. Rewarded Popup ads
a. Prerequisites
Before you start working with the ad unit, please make sure that the SDK is integrated and initialized as described here.
b. Ad Unit Implementation
To display a Rewarded Popup without any delay, the SDK must pre-cache a Rewarded Popup template first.
Swift

Personaly.precacheRewardablePopupTemplate { success, error in

}
Objective C

[Personaly precacheRewardablePopupTemplateWithQueue:nil completion:^(BOOL success, NSError * _Nullable error) {

}];
Templates have relatively large file sizes, so we recommend pre-caching as early as possible.
c. Dislpaying an Ad
Before displaying an ad please make sure you have pre-cached the template first. When pre-caching is finished, an ad should be ready to be displayed.
Make sure you specify the PlacementID every time you display a Rewarded Popup. The PlacementID key can be taken from our dashboard after defining a new ad placement.
Swift

Personaly.showRewardablePopup(forPlacement: placementID, serverParameter: nil, completion: { success, error in

})
Objective C

[Personaly showRewardablePopupForPlacement:placementID serverParameter:nil completion:^(BOOL success, NSError * _Nullable error) {

}];
A new ad can be shown if the previous ad was closed and is not currently being displayed.
5. Offer Wall Ad
a. Prerequisites
Before you start working with the ad unit, please make sure that the SDK is integrated and initialized as described here.
b. Displaying an Ad
The PlacementID key can be taken from our dashboard after defining a new ad placement.
Swift

Personaly.showOfferWall(forPlacement: placementID) { success, error in

}
Objective C

[Personaly showOfferWallForPlacement:placementID completion:^(BOOL success, NSError * _Nullable error) {

}];
A new ad can be shown if the previous ad was closed and is not currently being displayed.
6. Native Ads
Native Ads are presented to the users with the same look and feel of the app itself. Our SDK provides the classes of the ad (i.e text, creative, tracking etc.) to the publisher, and the publisher appends them into the native placements inside his app.
a. Prerequisites
Before you start working with the ad unit, please make sure that the SDK is integrated and initialized as described here.
b. Ad Unit Implementation
To display a Native Ad without any delay, the SDK needs to pre-cache a Native Ad Dataset.
Pre-caching can be done for each separate PlacementID. The PlacementID key can be found on our dashboard under the Native Ads tab in the ad setting page.
Use the following code for pre-caching:
Swift

let options = PersonalyNativeAdOptions()
options.shouldDownloadAssets = true // Pre-cache and save images and videos on disk. Default value is true.
options.numberOfAdsToPrecache = 5 // Maximum 5, default value is 1.
options.creativeType = "image" // Possible values: "image", "video", "both". Default value is "both".

Personaly.precacheNativeAds(forPlacement: placementID, options: options, completion: { nativeAds, error in

    //nativeAds contain an array of dataset objects of the class PersonalyNativeAd. See details below.
})
Objective C

PersonalyNativeAdOptions *options = [[PersonalyNativeAdOptions alloc] init];
options.shouldDownloadAssets = YES; // Pre-cache and save images and videos on disk. Default value is YES.
options.numberOfAdsToPrecache = 5; // Maximum 5, default value is 1.
options.creativeType = @"image"; // Possible values: @"image", @"video", @"both". Default value is @"both".

[Personaly precacheNativeAdsWithPlacementID:placementID options:options queue:nil completion:^(NSArray<PersonalyNativeAd *> * _Nonnull nativeAds, NSError * _Nullable error) {

    //nativeAds contains an array of dataset objects of the class PersonalyNativeAd. See details below.
}];
Dataset objects are represented by the PersonalyNativeAd and PersonalyNativeAdAsset classes. The PersonalyNativeAd class contains common information about Native the Ad, and PersonalyNativeAdAsset class contains image and video assets, as seen below:
class PersonalyNativeAd: NSObject {

    let adID: String
    let appName: String
    let storeAppID: String
    let storeAppURL: String
    let rating: Double
    let reviewsCount: Int
    let categories: [String]
    let appDeveloper: String
    let appDescription: String
    let appIconURL: String
    let appIconImage: UIImage? // Nil if pre-caching is disabled
    let assets: [PersonalyNativeAdAsset] // See PersonalyNativeAdAsset details below
    let privacyPolicyURL: String
    let privacyPolicyImageURL: String
    let callToActionText: String
    let impressionID: String
}
class PersonalyNativeAdAsset: NSObject {

    let URL: String // Server URL to access image or video.
    let type: String // Asset type: "image" or "video".
    let size: CGSize // Asset dimensions in pixels. For instance 800x600.
    let filePath: String? // Asset file local path on disk. Nil if pre-caching is disabled or SDK was not able to download file
    let image: UIImage? // UIImage object for asset type "image".
}
c. Dislpaying an Ad
When an ad is loaded, the app is then in charge of displaying it to the user (though it doesn’t necessarily have to do so immediately). To make displaying a Native Ad easier, our SDK offers some useful resources.
For Native Ads, our SDK offers the “ad view” class PersonalyNativeAdView.
This ad view class is a UIView that publishers should use to display the ad. The ad view class also provides IBOutlets used to register the view used for each individual asset. Registering the views in this way allows the SDK to automatically handle tasks such as:
- Recording clicks.
- Recording impressions (when an ad view is added to the view hierarchy).
class PersonalyNativeAdView: UIView {

   @IBOutlet weak var iconImageView: UIImageView?
   @IBOutlet weak var appNameLabel: UILabel?
   @IBOutlet weak var appDeveloperLabel: UILabel?
   @IBOutlet weak var appDescriptionLabel: UILabel?
   @IBOutlet weak var reviewsLabel: UILabel?
   @IBOutlet weak var callToActionButton: UIButton?
   @IBOutlet weak var imageView: UIImageView?
   @IBOutlet weak var mediaView: PersonalyMediaView? // To display video or image assets. See details below.
   @IBOutlet weak var ratingView: PersonalyRatingView? // To display star rating. See details below.
   @IBOutlet weak var privacyPolicyImageView: UIImageView? // To display privacy policy icon.
}
Video assets are displayed to users via PersonalyMediaView. This is a UIView that can be defined in an XIB file or constructed dynamically. It should be placed within the view hierarchy of a PersonalyNativeAdView, as with any other asset view.
- If a video asset is available, it starts playing inside the PersonalyMediaView.
- If the ad does not contain a video asset, the first image asset is downloaded and placed inside the PersonalyMediaView instead.
Star rating can sometimes be included with PersonalyRatingView:
class PersonalyRatingView: UIView {

    var emptyStarImage: UIImage // Use to customize empty star image
    var fullStarImage: UIImage // Use to customize full star image
    var halfFullStarImage: UIImage // Use to customize hlaf full star image
    var rating: Double // Rating range 0..5
}
The publisher does not need to manually populate a PersonalyNativeAdView with its dataset, as the SDK handles this automatically as follows:
Swift

let options = PersonalyMediaViewOptions()
options.shouldAutoplayVideo = true // Default value is true.
options.shouldLoopVideo = true // Default value is true.
options.shouldMuteVideo = false // Default value is false.

Personaly.populateNativeAdView(view: nativeAdView, nativeAd: nativeAd, options: [options], completion: { success, error in

})
Objective C

PersonalyMediaViewOptions *options = [[PersonalyMediaViewOptions alloc] init];
options.shouldAutoplayVideo = YES; // Default value is YES.
options.shouldLoopVideo = YES; // Default value is YES.
options.shouldMuteVideo = NO; // Default value is NO.

[Personaly populateNativeAdViewWithView:view with:nativeAd options:@[options] completion:^(BOOL success, NSError * _Nullable error) {

}];
d. Reporting
The publisher is responsible for reporting clicks and impressions when PersonalyNativeAdView is not used. PersonalyNativeAdView automatically handles all reporting tasks.
Reporting should be handled using the following code:
Swift

// Use PersonalyNativeAd object to get impressionID

// Report impression
Personaly.reportNativeAdImpression(impressionID: nativeAd.impressionID)

// Report click
Personaly.reportNativeAdClick(impressionID: nativeAd.impressionID)

// Report video started
Personaly.reportNativeAdVideoStarted(impressionID: nativeAd.impressionID)

// Report video ended
Personaly.reportNativeAdVideoEnded(impressionID: nativeAd.impressionID)
Objective C

// Use PersonalyNativeAd object to get impressionID

// Report impression
[Personaly reportNativeAdImpressionWithImpressionID:nativeAd.impressionID];

// Report click
[Personaly reportNativeAdClickWithImpressionID:nativeAd.impressionID serverParameter:nil];

// Report video started
[Personaly reportNativeAdVideoStartedWithImpressionID:nativeAd.impressionID];

// Report video ended
[Personaly reportNativeAdVideoEndedWithImpressionID:nativeAd.impressionID];
7. Mediation
MoPub
This section is for publishers that wish to serve Persona.ly’s ad units (rewarded video/playable, interstitial video/playable, and native ads) using MoPub’s mediation network.
a. Prerequisites
Before you start working with the MoPub adapter, please make sure that the Persona.ly SDK is integrated and initialized as described here. You should also integrate the MoPub SDK as described here.
The Persona.ly mediation adapter for MoPub supports the following ad units:
- Interstitial
- Rewarded video
- Native
b. Adapter integration
Download the archive linked here, extract our flies from the archive, and drag and drop the files to your project.
Important: Note that the MoPub adapter uses PersonalyDelegate to get notified about SDK events. You must not use PersonalyDelegate when you use the MoPub adapter.
c. Set up MoPub
- Log in to your MoPub UI.
- Navigate to the Apps page and click the Add a New App button.
- Select iOS as the Platform for your app, enter the App name and iTunes URL of your app. Then select a primary and secondary category of your app from the provided list.
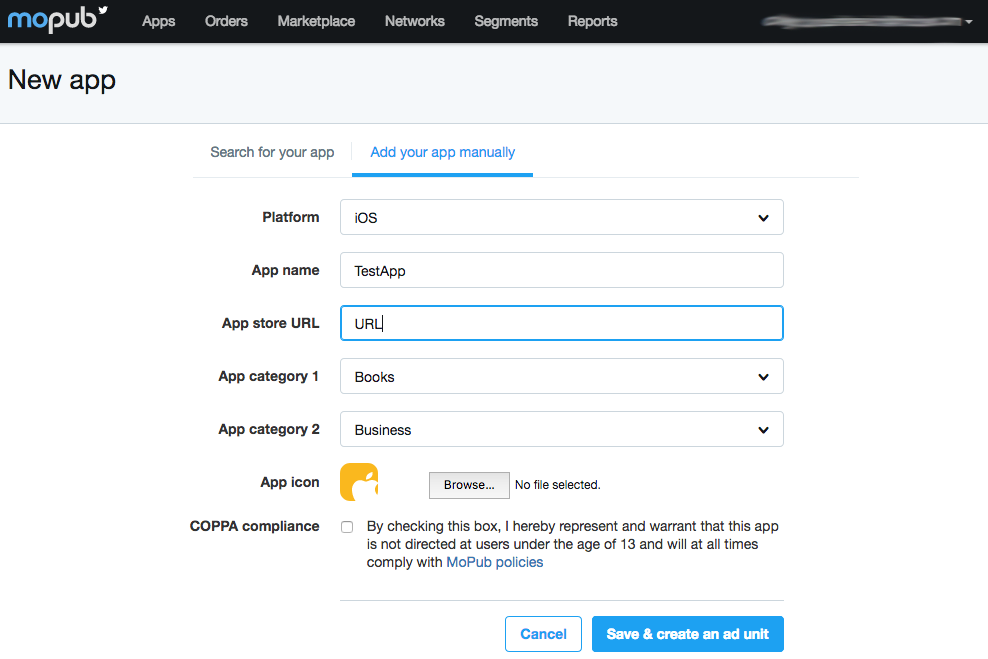
- MoPub requires you to create your first Ad Unit before finishing adding your app. Click New ad unit button to add a new Ad Unit:
- Interstitial
- Rewarded Video
- Native
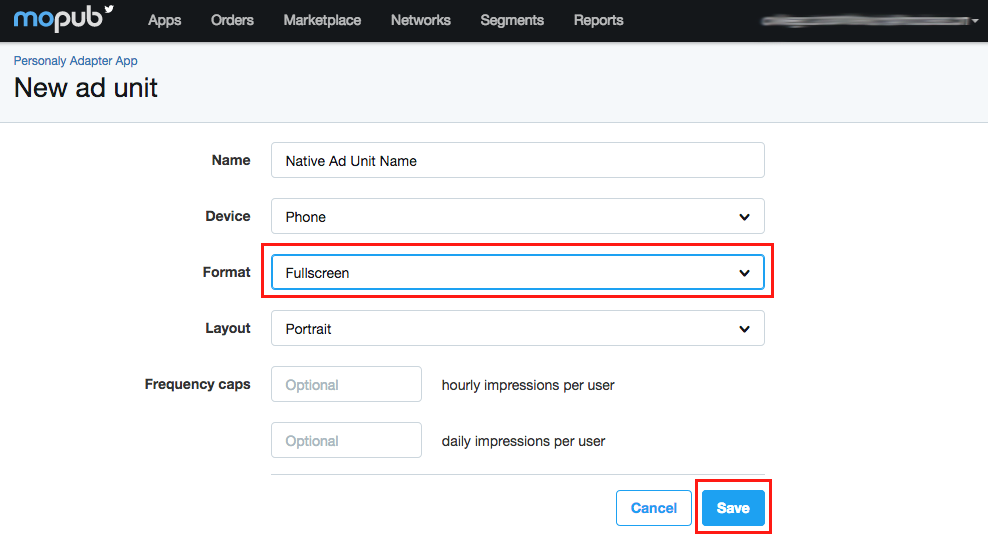
Enter Ad Unit name and choose Device type. Choose Fullscreen as the Format. Choose the type of Layout to present the ad in. Click Save to get your Ad Unit ID.
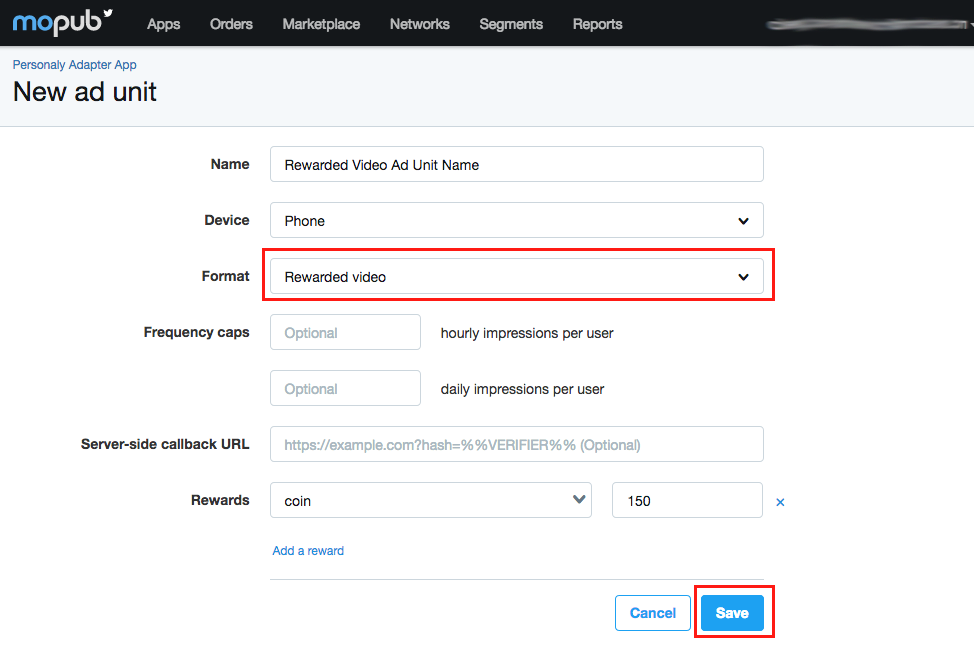
Enter Ad Unit name and choose Device type. Choose Rewarded video as the Format. Click Save to get your Ad Unit ID.
Enter Ad Unit name and choose Device type. Choose Native as the Format. Click Save to get your Ad Unit ID.

d. Configure mediation settings for MoPub ad unit
- Navigate to the Networks page and click the Add a Network button.
- Select Custom Native Network, enter a Title and specify the Custom Event Class and the Custom Event Class Data for your Ad Unit:
- Interstitial
- Rewarded Video
- Native
Custom Event Class: PersonalyInterstitialCustomEvent
Custom Event Class Data: {"appId": "PERSONALY_APP_ID", "placementId": "PERSONALY_PLACEMENT_ID"}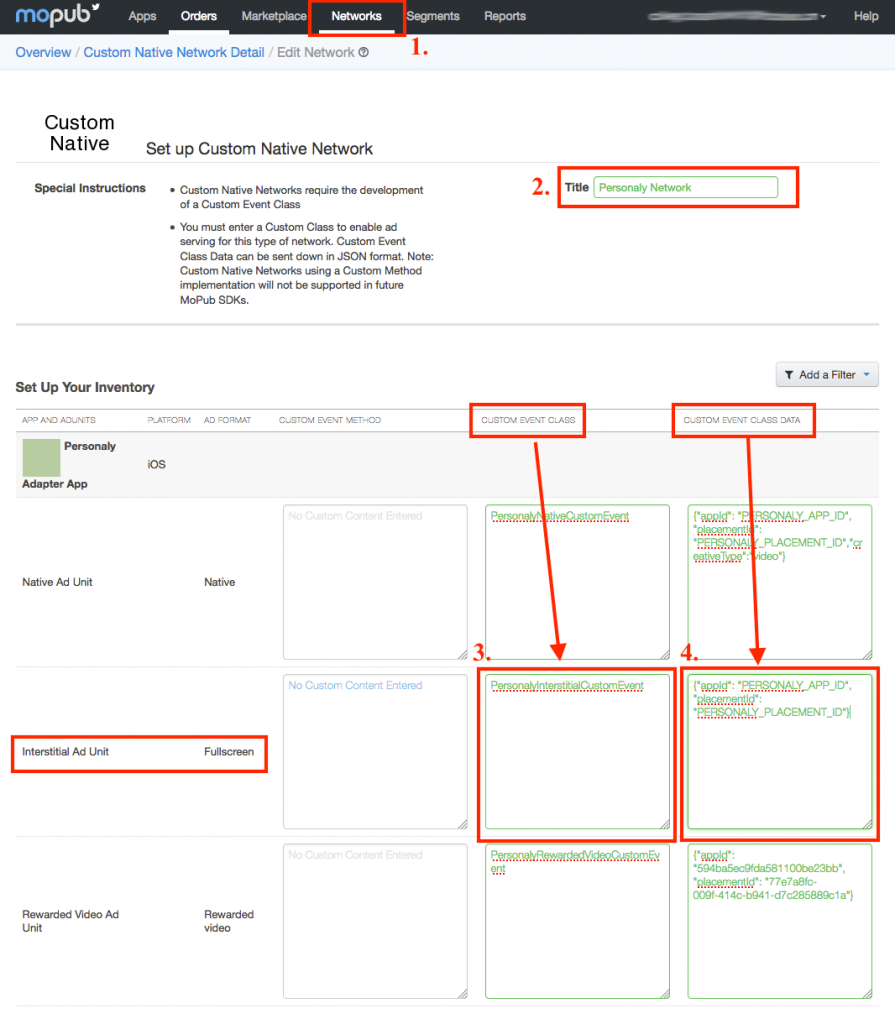
Custom Event Class: PersonalyRewardedVideoCustomEvent
Custom Event Class Data: {"appId": "PERSONALY_APP_ID", "placementId": "PERSONALY_PLACEMENT_ID"}
Custom Event Class: PersonalyNativeCustomEvent
Custom Event Class Data: {"appId": "PERSONALY_APP_ID", "placementId": "PERSONALY_PLACEMENT_ID","creativeType":"video"}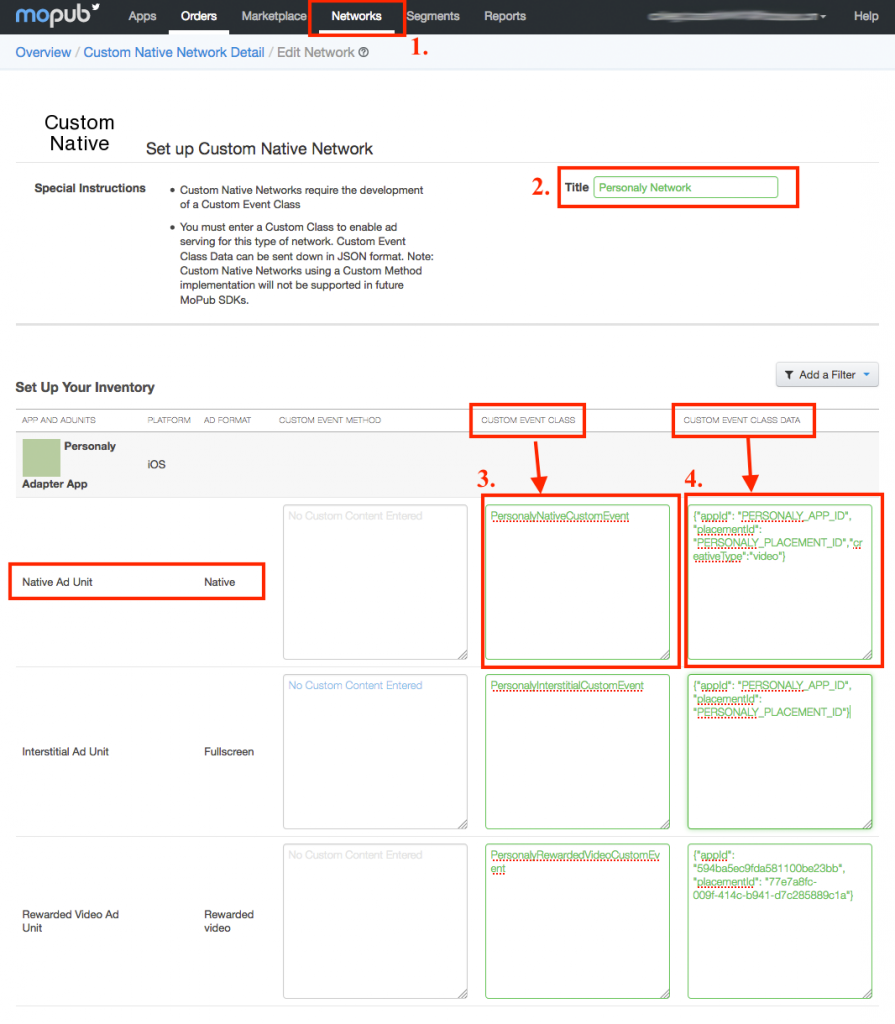
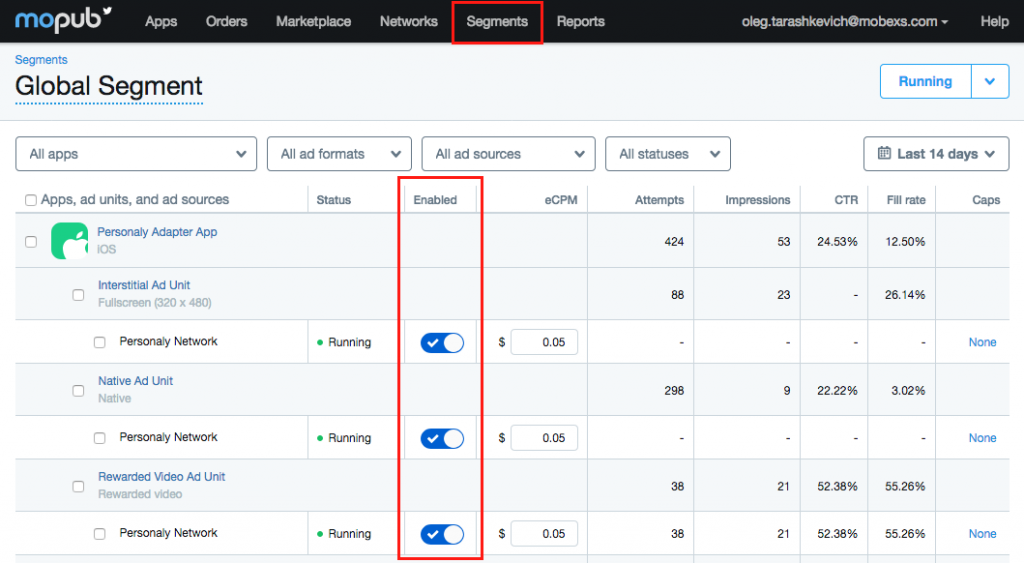
- Navigate to the Segments page and choose your segment. Enable Ad Network for your Ad Unit.
e. Using native ads
To display native ads you have to set up the MoPub Native Ad Renderer Configuration as follows:
Swift

let settings = MPStaticNativeAdRendererSettings()
let config = MPStaticNativeAdRenderer.rendererConfiguration(with: settings)
config?.supportedCustomEvents.append("PersonalyNativeCustomEvent") // Set custom event class name
The PersonalyNativeCustomEvent class provides a list of keys that you can use to access additional properties of the object of the class MPNativeAd provided by the Personaly SDK:
kPersonalyNativeAdReviewsCountKey // App reviews count. Int value.
kPersonalyNativeAdAppDeveloperKey // App developer name. String value.
kPersonalyNativeAdAppStoreIDKey // Apple Itunes app ID. String value.
kPersonalyNativeAdCategoriesKey // List of app categories. Array of strings.
kPersonalyNativeAdPrivacyPolicyURLKey // Privacy policy URL. String value.
kPersonalyNativeAdPrivacyPolicyImageURLKey // Privacy policy image URL. String value.
You can use these keys as follows:
Swift

let nativeAd: MPNativeAd // This object you get from MoPub
let reviewsCount = nativeAd.properties[PersonalyNativeCustomEvent.kPersonalyNativeAdReviewsCountKey]
AdMob
This section is for publishers that wish to serve Persona.ly’s ad units (rewarded video/playable and interstitial video/playable) using AdMob’s mediation network.
a. Prerequisites
Before you start working with AdMob adapter, please make sure that the Persona.ly SDK is integrated and initialized as described here. You should also integrate the AdMob SDK as described here.
The Persona.ly mediation adapter for AdMob supports the following ad units:
- Interstitial
- Rewarded video
b. Adapter integration
Download the archive linked here, extract our flies from the archive, and drag and drop the files to your project.
Important: Note that the AdMob adapter uses PersonalyDelegate to get notified about SDK events. You must not use PersonalyDelegate when you use the AdMob adapter.
c. Set up AdMob
- Sign in to your AdMob account.
- Choose an application to configure mediation for.
- Create a new Ad Unit.
- Open the Mediation section.
- Create a new mediation group:
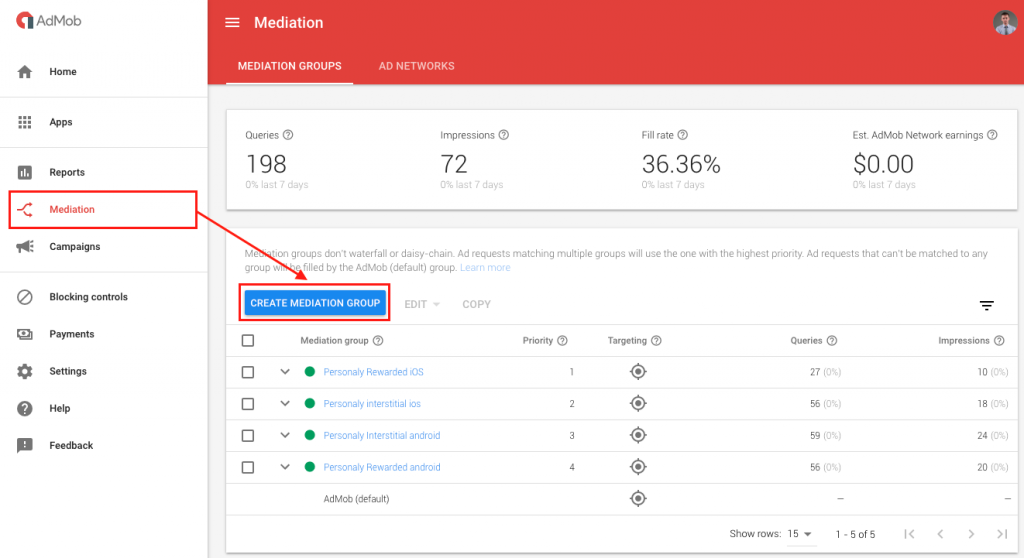
- Choose an Interstitial or Rewarded video ad format.
- Add ad units.
- Add a new Custom Event.
- Set Class Name and Parameter:
- Interstitial
- Rewarded video
Class Name: PersonalyAdMobCustomEvent
Parameter: {"appId": "PERSONALY_APP_ID", "placementId": "PERSONALY_PLACEMENT_ID"}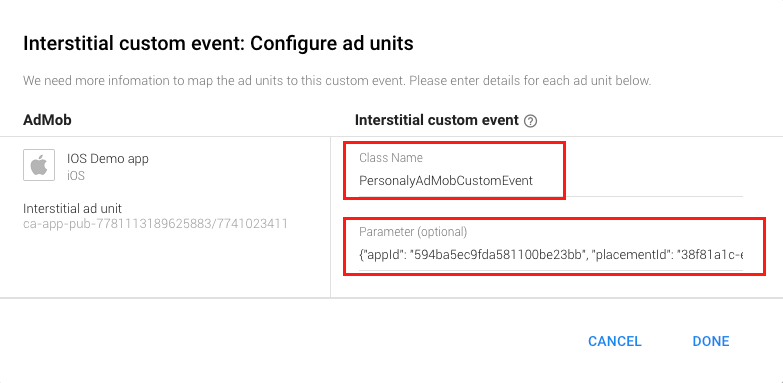
Class Name: PersonalyVideoAdNetworkAdapter
Parameter: {"appId": "PERSONALY_APP_ID", "placementId": "PERSONALY_PLACEMENT_ID"}
- Save all changes.
You can find more details about the AdMob integration for Rewarded video here and for Interstitials here.