Please follow the instructions below to integrate our Android SDK to your app. Demo app is available on GitHub repo.
1. SDK Implementation
a. Prerequisites
- Android version 4.0.3 (API level 15) or higher
- Google Play services 7.5 or higher
b. Integration
The android SDK version should 15 or higher.
defaultConfig {
      minSdkVersion 15
      ...
   }
The SDK needs the advertisingId from AdvertisingIdClient.class of the play services library, so please ensure that you are using the same version:
compile 'com.google.android.gms:play-services-basement:11.0.2'Also, you can exclude this version and put another one in your app’s build.gradle or add multidex for supporting multiple dependencies. Note that Play Services is a required library.
Please add the following rules to your ProGuard file:
-dontwarn com.google.**
-dontwarn com.android.**
-dontwarn android.webkit.**
-dontwarn com.unity3d.player.UnityPlayer
-keepattributes *Annotation*, Exceptions, Signature, Deprecated, SourceFile, SourceDir, LineNumberTable, LocalVariableTable, LocalVariableTypeTable, Synthetic, EnclosingMethod, RuntimeVisibleAnnotations, RuntimeInvisibleAnnotations, RuntimeVisibleParameterAnnotations, RuntimeInvisibleParameterAnnotations, AnnotationDefault, InnerClasses

-keep class com.google.** { *; }
-keep class com.android.** { *; }
Add dependency from remote or local binaries.
Remote
Add the following lines to build.gradle of your app and build the project:
repositories {
    maven { url 'https://dl.bintray.com/personaly/maven' }
}

dependencies {
    compile 'ly.persona.sdk:personaly:1.0.678@aar'
}
Local
- Download the latest version of Personaly.aar file by clicking here.
- Add this file to the libs folder of the application.
- Add the following lines to build.gradle of your app and build the project:
allprojects {
    repositories {
        jcenter()
        flatDir {
            dirs 'libs'
        }
    }
}

dependencies {
    compile(name: 'personaly-1.0.678', ext: 'aar')
}
c. Android permissions
The SDK limits the WRITE_EXTERNAL_STORAGE permission to devices with api level 18 or lower. If you are not supporting those api levels, you don’t need to remove the permission. If you want to change this permission please follow by next instructions:
- Open your AndroidManifest.xml file.
- Add the tools-namespace to the root element:
<manifest xmlns:android="http://schemas.android.com/apk/res/android"
      xmlns:tools="http://schemas.android.com/tools" …>
- If in some cases you need to use WRITE_EXTERNAL_STORAGE without limitation please use replace to override this permission:
<uses-permission android:name="android.permission.WRITE_EXTERNAL_STORAGE"
      tools:node="replace" />
- If the app will use api level 19 and higher and no need to use WRITE_EXTERNAL_STORAGE – you can remove permission by next way:
<uses-permission android:name="android.permission.WRITE_EXTERNAL_STORAGE"
      tools:node="remove" />
- Build the app.
More details about AndroidManifest.xml merging is placed here.
d. Initialization
Optionally, set the gender, the date of birth (in the format “yyyy/MM/dd”) and the age before initializing:
Personaly.CONFIG
        .setGender(Gender.MALE)
        .setDateOfBirth("1989/07/22") // Date of birth can also be passed as a number - .setDateOfBirth(1989, 8, 12)
        .setAge(19)
        .setUserId(userId);
USERS_ID should be unique and defined for the current user.
The APP_ID key can be found on our dashboard after you finish setting up an app. Place next code in the custom Application.class in onCreate() method or in another application launch location:
Personaly.init(context, APP_ID);
Optionally, you can initialize the SDK with a callback:
Personaly.InitCallback initCallback = new Persona.InitCallback() {
        @Override
        public void onSuccess() {
            // Initialization has been successfully performed
        }

        @Override
        public void onFailure(Throwable throwable) {
            // An error occurred while initializing

             if (throwable instanceof PersonaError) {
                PersonaError error = (PersonaError) throwable;
                int errorCode = error.getErrorCode();
                String message = error.getMessage();
                // Do something with errorCode if it needed
            }
        }
    };
Personaly.init(context, APP_ID, initCallback);
To check if the SDK was already initialized, use the following:
boolean isInitialized = Personaly.isInitialized();e. Setting up the listener
In order to listen to all the different phases of an ad’s life cycle, our SDK includes the AdListener class.
public class AdListener {

        @Override
        public void onAdStartLoading() {
            // the ad is starting load
        }

        @Override
        public void onAdLoaded() {
            // the ad is loaded
        }

          @Override
        public void onAdShowed() {
            // the ad is visible on the screen
        }

        @Override
        public void onAdClicked() {
            // user clicked on the ad
        }

        @Override
        public void onAdRewarded(Impression impression) {
           // Using for Rewardable type of ad
           // user saw the full ad and we can reward him with currency
            int amount = impression.getRewardedAmount();
        }

        @Override
        public void onAdFailed(Throwable throwable) {
            // An error occurred while working with the ad

             if (throwable instanceof PersonaError) {
                PersonaError error = (PersonaError) throwable;
                int errorCode = error.getErrorCode();
                String message = error.getMessage();
                // Do something with errorCode if it needed
            }
        }

        @Override
        public void onAdClosed() {
            // the ad is closed
        }
}
Create a new object of AdListener and set it to any instance of the ad:
ad.setListener(new AdListener(){
   // Override methods
})
f. Error codes
The SDK includes the PersonaError class that helps identify each error and understands what’s wrong. The error can be received in the onAdFailed method of the listener.
// Incorrect sdk initialization, wrong or empty ad keys (appId, placementId, etc...)
int ERROR_INIT = 1;

// Internal SDK error, not related to the publisher
int ERROR_INTERNAL = 2;

// The ad request was unsuccessful due to network connectivity issues or a resource was not found
int ERROR_NETWORK = 3;

// The ad will not load
int ERROR_NO_AD = 4;

// The ad is loading or currently being displayed, please hold
int ERROR_BUSY_AD = 5;
g. Auto-caching
Interstitial ad and Rewarded video ad will be loaded automatically and immediately after successfully initialization, if placement ids are available in the users dashboard. In order to change this behaviour switch on/off placement id on the dashboard or use next line in the code:
Personaly.setAutoCaching(true);
h. Test Mode
SDK has the test mode for testing purposes.
In order to activate the test mode for the device:
- Launch the app and find an TEST_MODE_ID in the logs.
D/TEST_MODE_ID: Add TEST_MODE_ID: 854g5d22-36f8-45da-9482-efbdd6cdjnc5 to list of devices in order to use TEST_MODE
- Open the Test integration page.
- Add TEST_MODE_ID to the list of test devices.
2. Rewarded Video/Playable ad
a. Prerequisites
Before you start working with the ad unit, please make sure that the SDK is integrated and initialized as described here.
b. Auto-Cache (recommended)
The ad has ability to load multiply Campaign with different placement ids. It can be loaded automatically or manually. By default this ad has enabled auto caching, but it can be changed in any moment and from any place of the project. It pre-caches next ad for particular placement just after showing an ad. However if you disable auto-caching you will have to manually pre-cache the ad.
Personaly.setAutoCaching(true);
c. Implementation
The REWARDED_PLACEMENT_ID key can be found in our dashboard (as placement id) after you define a new ad placement under Rewarded Moment tab in the ad settings page.
Get the instance of CampaignAd by REWARDED_PLACEMENT_ID, set the listener and load an ad:
CampaignAd.get(REWARDED_PLACEMENT_ID)
        .setListener(listener)
        .setServerParams(params)   // Optional method
        .load();                   // for manually caching
Rewarded Moments have relatively large file sizes, so we recommend pre-caching as early as possible.
Our SDK has the ability to pre-cache ads for multiple PlacementIDs, but only one ad per PlacementID at a time.
A new ad can be shown if the previous ad was closed and is not currently being displayed. To make sure a new ad can be displayed, it’s recommended to use the onAdClosed() method of the listener.
CampaignAd includes an optional method to check if the ad is currently being displayed:
boolean isShowing = CampaignAd.get(REWARDED_PLACEMENT_ID).isShowing();
In order to remove the listener use next line:
CampaignAd.get(REWARDED_PLACEMENT_ID).removeListener()d. Displaying an ad
Ensure that an ad is loaded in the onAdLoaded() method of AdListener, or check it manually with the following code:
boolean isReady = CampaignAd.get(REWARDED_PLACEMENT_ID).isReady();
If an ad is loaded and ready to be displayed, use the following:
CampaignAd.get(REWARDED_PLACEMENT_ID).show();
To check that the ad had not met its cap with CampaignAd, use the following method:
CampaignAd.get(REWARDED_PLACEMENT_ID)
          .canView(new CanViewCallback() {
              @Override
              public void canView(boolean canView) {
                    if (canView){
                         // This ad can be displayed
                    } else {
                         // This ad cannot be displayed
                    }
              }
          });
d. Rewarding your user
When using Rewarded Moments, you have the ability to configure your postback method: Server to server or Client Side. When choosing the Client Side method, please check for a reward in the onRewarded method of the listener:
@Override
 public void onAdRewarded(Impression impression) {

    // user saw the full ad and we can reward him with currency
    int amount = impression.getRewardedAmount();

    // optional values
    boolean hasRewaredAmount = impression.hasRewardedAmount();
    boolean isRewardedVideo = impression.isRewardedVideo();
    boolean isRewardedPlayable = impression.isRewardedPlayable();
}
3. Interstitial Video/Playable ad
a. Prerequisites
Before you start working with the ad unit, please make sure that the SDK is integrated and initialized as described here.
b. Auto-Cache (recommended)
The ad has ability to load multiply Campaign with different placement ids. It can be loaded automatically or manually. By default this ad has enabled auto caching, but it can be changed in any moment and from any place of the project. It pre-caches next ad for particular placement just after showing an ad. However if you disable auto-caching you will have to manually pre-cache the ad.
Personaly.setAutoCaching(true);
c. Implementation
The INTERSTITIAL_PLACEMENT_ID key can be found in our dashboard (as placement id) after you define a new ad placement under Interstitial tab in the ad settings page.
Get the instance of CampaignAd by INTERSTITIAL_PLACEMENT_ID, set the listener (described in step 1.e.) and load an ad:
CampaignAd.get(INTERSTITIAL_PLACEMENT_ID)
          .setListener(listener)
          .setServerParams(params)   // Optional method
          .load();                   // for manually caching
Videos and playable ads have relatively large file sizes, so we recommend pre-caching as early as possible.
Our SDK has the ability to pre-cache ads for multiple PlacementIDs, but only one ad per PlacementID at a time.
A new ad can be shown if the previous ad was closed and is not currently being displayed. To make sure a new ad can be displayed, it’s recommended to use the onAdClosed() method of the listener.
CampaignAd includes an optional method to check if the ad is currently being displayed:
boolean isShowing = CampaignAd.get(INTERSTITIAL_PLACEMENT_ID).isShowing();
d. Displaying an ad
Ensure that an ad is loaded in the onAdLoaded() method of AdListener, or check it manually with the following code:
boolean isReady = CampaignAd.get(INTERSTITIAL_PLACEMENT_ID).isReady();
If an ad is loaded and ready to be displayed, use the following:
CampaignAd.get(INTERSTITIAL_PLACEMENT_ID).show();
To check that the ad had not met its cap with CampaignAd, use the following method:
CampaignAd.get(INTERSTITIAL_PLACEMENT_ID)
          .canView(new CanViewCallback() {
              @Override
              public void canView(boolean canView) {
                    if (canView){
                         // This ad can be viewed
                    } else {
                         // This ad cannot be viewed
                    }
              }
          });
4. Rewarded Pop up ad
a. Prerequisites
Before you start working with the ad unit, please make sure that the SDK is integrated and initialized as described here.
b. Implementation
The POPUP_OFFER_PLACEMENT_ID key can be found in our dashboard (as placement id) after you define a new ad placement under Rewarded Pop-up tab in the ad settings page.
Get the instance of PopupOfferAd by POPUP_OFFER_PLACEMENT_ID, set the listener and load an ad:
Ads have relatively large file sizes, so we recommend pre-caching as early as possible.
Our SDK has the ability to pre-cache ads for multiple PlacementIDs, but only one ad per PlacementID at a time.
A new ad can be shown if the previous ad was closed and is not currently being displayed. To make sure a new ad can be displayed, it’s recommended to use the onAdClosed() method of the listener.
PopupOfferAd includes an optional method to check if the ad is currently being displayed:
boolean isShowing = PopupOfferAd.get(POPUP_OFFER_PLACEMENT_ID).isShowing();
c. Displaying an ad
Ensure that an ad is loaded in the onAdLoaded() method of AdListener, or check it manually with the following code:
boolean isReady = PopupOfferAd.get(POPUP_OFFER_PLACEMENT_ID).isReady();
If an ad is loaded and ready to be displayed, use the following:
PopupOfferAd.get(POPUP_OFFER_PLACEMENT_ID).show();
In order to remove the listener use next line:
PopupOfferAd.get(POPUP_OFFER_PLACEMENT_ID).removeListener()5. Offer Wall ad
a. Prerequisites
Before you start working with the ad unit, please make sure that the SDK is integrated and initialized as described here.
b. Displaying an ad
The OFFER_PLACEMENT_ID key can be found in our dashboard (as placement id) after you define a new ad placement under Offer Wall tab in the ad settings page.
Get the instance of OfferWallAd by OFFER_PLACEMENT_ID, set the listener and show an ad:
A new ad can be shown if the previous ad was closed and is not currently being displayed. To make sure a new ad can be displayed, it’s recommended to use the onAdClosed() method of the listener.
OfferWallAd includes an optional method to check if the ad is currently being displayed:
boolean isShowing = OfferWallAd.get(OFFER_PLACEMENT_ID).isShowing();
In order to remove the listener use next line:
OfferWallAd.get(OFFER_PLACEMENT_ID).removeListener()
6. App Wall ad
a. Prerequisites
Before you start working with the ad unit, please make sure that the SDK is integrated and initialized as described here.
b. Displaying an ad
The APP_WALL_PLACEMENT_ID key can be found in our dashboard (as placement id) after you define a new ad placement under App Wall tab in the ad settings page.
Get the instance of AppWallAd by APP_WALL_PLACEMENT_ID, set the listener (described in step e.) and show an ad:
A new ad can be shown if the previous ad was closed and is not currently being displayed. To make sure a new ad can be displayed, it’s recommended to use the onAdClosed() method of the listener (described in step e.).
AppWallAd includes an optional method to check if the ad is currently being displayed:
boolean isShowing = AppWallAd.get(APP_WALL_PLACEMENT_ID).isShowing();
In order to remove the listener use next line:
AppWallAd.get(APP_WALL_PLACEMENT_ID).removeListener()7. Native Ads
Native Ads are presented to the users with the same look and feel of the app itself. Our SDK provides the classes of the ad (i.e text, creative, tracking etc.) to the publisher, and the publisher appends them into the native placements inside his app.
a. Prerequisites
Before you start working with the ad unit, please make sure that the SDK is integrated and initialized as described here.
b. Implementation
The NATIVE_PLACEMENT_ID key can be found in our dashboard (as placement id) after you define a new ad placement under Native ad tab in the ad settings page.
To get an instance of NativeAd by NATIVE_PLACEMENT_ID, set up the listener (described in step e.).
Native ads have the ability to pre-cache images and videos. By default, pre-caching is enabled for one (NumOfAds.ONE) ad entity and disabled for more. It can be changed with the setPreCaching() method. The maximum number of ad entities possible to load is five (NumOfAds.FIVE).
The method setCreativeType() is responsible for loading special types of creatives. By default, the SDK loads all available types. The possible values are: CreativeType.ALL, CreativeType.IMAGE, CreativeType.VIDEO.
Use the load() or load(@NumOfAds int count) method for starting loading an ad:
NativeAd.get(NATIVE_PLACEMENT_ID)
        .setListener(adNativeListener)
        .setPreCaching(boolean preCaching)          // Optional method
        .setCreativeType(@CreativeType String type) // Optional method
        .setServerParams(params)                    // Optional method
        .load();
//      .load(NumOfAds.TWO);
//      .load(2);
c. Setting up the listener
Native ads have a listener which enables receiving a callback for different actions:
public class NativeAdListener extends AdListener {

    public void onNativeDataSetLoaded(List<NativeDataSet> dataSets) {
        // The data set is loaded and views can be populated
    }

    public void onNativeAdLayoutPopulated(NativeAdLayout layout){
        View populatedView = (View) layout;
        // NativeAdLayout has been populated with data of NativeDataSet
    }
}
In order to use additional methods of the listener, please override the methods from AdListener.
In order to remove the listener use the following code:
NativeAd.get(NATIVE_PLACEMENT_ID).removeListener()d. Data set
Once the data set has been received in the listener – populate the native views.
@Override
public void onNativeDataSetLoaded(List<NativeDataSet> dataSets) {

    for (NativeDataSet dataSet : dataSets) {

        if (dataSet != null) {

            // Create a custom view
            NativeAdLayout adLayout = getCustomView();

            // Populate NativeAdLayout with the data set
            NativeAd.populateNativeAdLayout(adLayout, dataSet);
        }
    }
}
NativeAd has an optional, different method to get a data set. Note that it is available only if the data has been loaded. It can be called in the onLoaded() method of the listener.
List<NativeDataSet> dataSets = NativeAd.get(NATIVE_PLACEMENT_ID).getNativeDataSet();
The dataset object is represented by the NativeDataSet class which contains common information about the Native Ad.
public interface NativeDataSet {
    String getIconFilePath();
    String getImageFilePath();
    String getVideoFilePath();
    String getIconUrl();
    String getImageUrl();
    String getVideoUrl();
    String getAppName();
    String getAppDescription();
    String getAppDeveloper();
    float getRating();
    long getReviews();
    String getCTA();
    String getLandingPage();
    String getAppId();
    String getAdId();
    String getTrackingUrl();
    String getImpressionId();
    String getPrivacyPolicyUrl();
    String getPrivacyPolicyFilePath();
    String getPrivacyPolicyImageUrl();
    boolean hasData();
    @CreativeType String getCreativeType();
    boolean isPreCached();
}
e. Creating native views
Our SDK offers three different ways to create native views. Each of the views is customizable (change view color, size, position, etc.).
- Add a default NativeAdView class to XML layout or create one programmatically:
<ly.persona.sdk.NativeAdView android:id="@+id/native_ad_view" android:layout_width="match_parent" android:layout_height="wrap_content"/> - Create a custom view in the XML layout and build with the NativeAdView.Builder class:
NativeAdView adLayout = new NativeAdView.Builder(context, R.layout.pn_ad_view_layout) .titleId(R.id.pn_title) // TextView resource id .descriptionId(R.id.pn_description) // TextView resource id .appDeveloperId(R.id.pn_app_developer) // TextView resource id .iconId(R.id.pn_icon) // ImageView resource id .mediaView(R.id.pn_media_view) // MediaView resource id (video or image) .buttonId(R.id.pn_button) // Button resource id .ratingBarId(R.id.pn_rating_bar) // RatingBar resource id .reviewsId(R.id.pn_reviews) // TextView resource id .config(NativeAdConfig.create()) // Optional configuration .privacyPolicyId(R.id.pn_privacy_policy) .build(); - Create a custom view and implement the NativeAdLayout interface. For an example, find the NativeAdView class in our SDK.
public class CustomNativeAdView extends RelativeLayout implements NativeAdLayout {
    ...
}
The SDK contains the MediaView class for displaying the main image or video creative. This view is required when you want to add any custom view for displaying creatives. Use MediaView able to play/pause the video, by using the play() and pause() methods.
For advanced configuration of NativeAdView (NativeAdLayout) refer to the following code:
// Optional setup of NativeAdConfig
adLayout.getNativeAdConfig()
        .setCreativeType(@CreativeType String type)  // Priority type of the creative
        .setVideoMuted(boolean mute)                 // false by default
        .setVideoLooping(boolean looping)            // true by default
        .setVideoAutoPlay(boolean autoPlay);         // true by default
In order to populate Native View use populateNativeAdLayout method like here:
@Override
public void onNativeDataSetLoaded(List<NativeDataSet> dataSets) {

    for (NativeDataSet dataSet : dataSets) {

        if (dataSet != null) {

            // Create a custom view
            NativeAdLayout adLayout = ...

            // Populate NativeAdLayout with the data set
            NativeAd.populateNativeAdLayout(adLayout, dataSet);
        }
    }
}
f. Reporting
Publisher is responsible for reporting clicks and impressions in case when no methods of view creation has been used from here. Any view which has been populated with NativeAd.populateNativeAdLayout(adLayout, dataSet) method automatically handles reporting tasks.
NativeDataSet dataSet = ...
String impressionId = dataSet.getImpressionId();
NativeAd ad = NativeAd.get(NATIVE_PLACEMENT_ID);

// Report an impression if the ad with image/video starts showing
ad.reportImpressionStarted(impressionId);

// Report an impression if the ad with video showing was finished
ad.reportImpressionFinished(impressionId);

// Report click on the Google Play button
ad.reportAdClicked(impressionId);

// Open the app page on Google Play and track it
ad.openGooglePlayById(dataset);
// ad.openGooglePlayById(dataset.getAppId(), data.getTrackingUrl());
8. Disposing of ads
Our SDK includes optional methods for disposing of cached ads. If there is no need to store cached ads for the current screen, the methods listed below, for example in onDestroy() of the activity:
@Override
protected void onDestroy() {
    super.onDestroy();
    CampaignAd.dispose(REWARDED_PLACEMENT_ID);
    CampaignAd.dispose(INTERSTITIAL_PLACEMENT_ID);
    PopupOfferAd.dispose(POPUP_OFFER_PLACEMENT_ID);
    OfferWallAd.dispose(OFFER_PLACEMENT_ID);
    AppWallAd.dispose(APP_WALL_PLACEMENT_ID);
    NativeAd.dispose(NATIVE_PLACEMENT_ID);
}
9. Mopub Mediation
This section describes how to serve Persona.ly’s ad units (rewarded video/playable, interstitial video/playable, and native ads) using Mopub’s mediation network.
a. Prerequisites
Before you start working with the MoPub adapter, please make sure that the Persona.ly SDK is integrated and initialized as described here. You should also integrate the MoPub SDK as described here.
The Persona.ly mediation adapter for MoPub supports the following ad units:
- Interstitial
- Rewarded video
- Native ads
b. Integration
Add dependency from remote or local binaries:
Remote
Add the following lines to build.gradle of your app and build the project:
repositories {
    maven { url 'https://dl.bintray.com/personaly/maven' }
}

dependencies {
    compile 'ly.persona.sdk:mediation_mopub:1.0.621@aar'
}
Local
- Download the PersonalyMoPub.aar file by clicking here.
- Add the PersonalyMoPub.aar file to the libs folder of the application.
- Add the following lines to build.gradle of your app and build the project:
allprojects {
    repositories {
        jcenter()
        flatDir {
            dirs 'libs'
        }
    }
}

dependencies {
    compile(name: 'PersonalyMoPub', ext: 'aar') }
c. Setting up
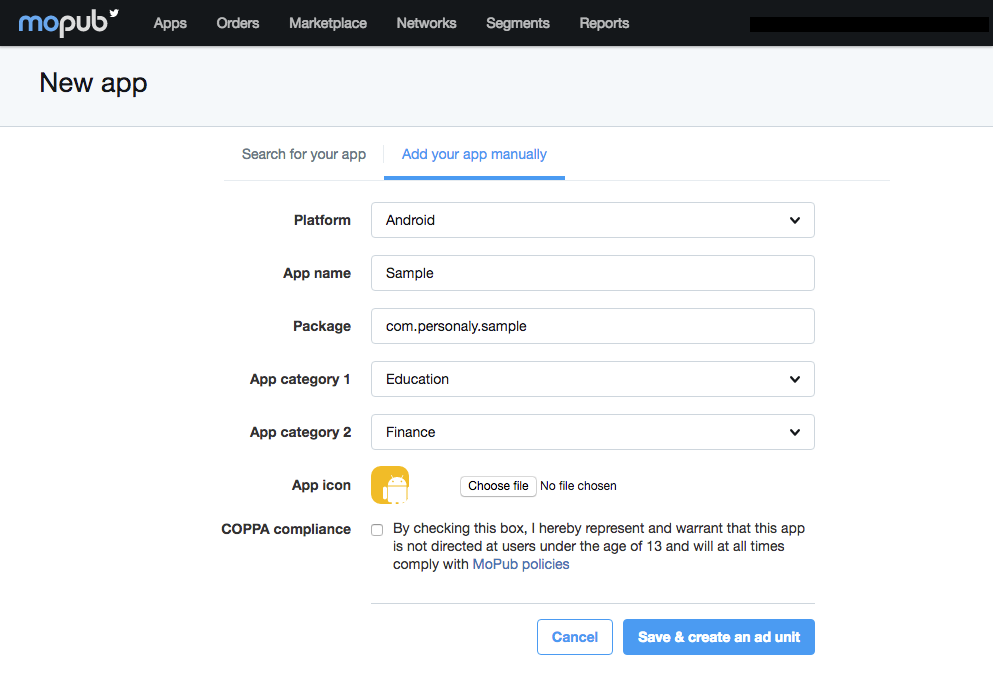
- Log in to MoPub.
- Navigate to the Apps page and click the Add a New App button.
- Select Android as the Platform for your app, enter the App name and the Package name of your app. Then, select the primary and secondary categories of your app from the provided list.
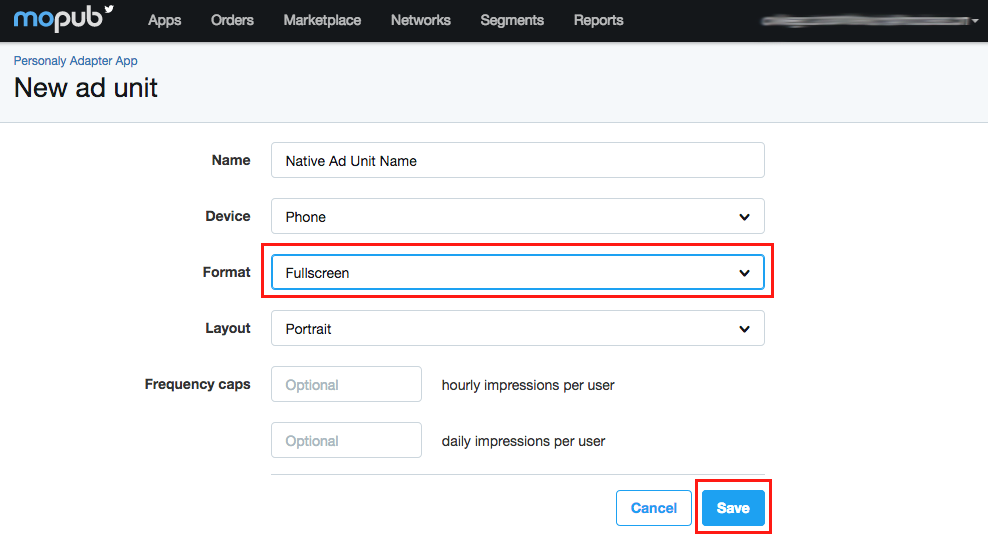
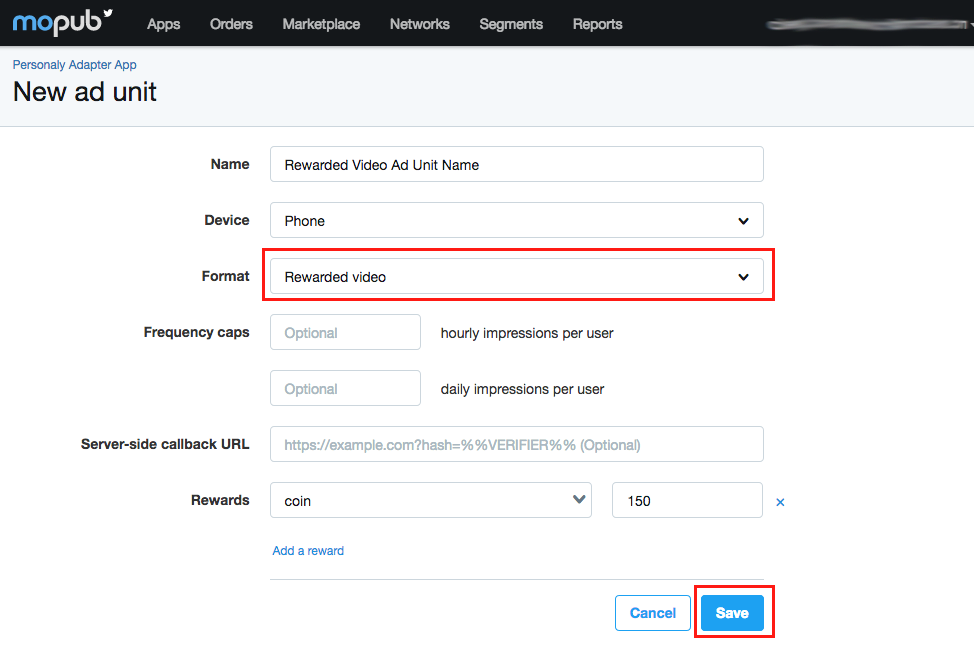
- MoPub requires you to create your first Ad Unit before finishing adding your app. Click the New ad unit button to add a new Ad Unit:
- Interstitial
- Rewarded Video
- Native
Enter the Ad Unit name and choose the Device type. Choose Fullscreen as the Format. Choose the type of Layout to present the ad in. Click Save to get your Ad Unit ID.
Enter the Ad Unit name and choose the Device type. Choose Rewarded video as the Format. Click Save to get your Ad Unit ID.
Enter the Ad Unit name and choose the Device type. Choose Native as the Format. Click Save to get your Ad Unit ID.

d. Configure mediation settings for the MoPub ad unit
- Navigate to the Networks page and click the Add a Network button.
- Select Custom Native Network, enter the Title and specify the Custom Event Class and the Custom Event Class Data for your Ad Unit:
- Interstitial
- Rewarded Video
- Native
Custom Event Class: com.mopub.mobileads.PersonalyInterstitial
Custom Event Class Data: {"appId": "APP_ID", "placementId": "INTERSTITIAL_PLACEMENT_ID"}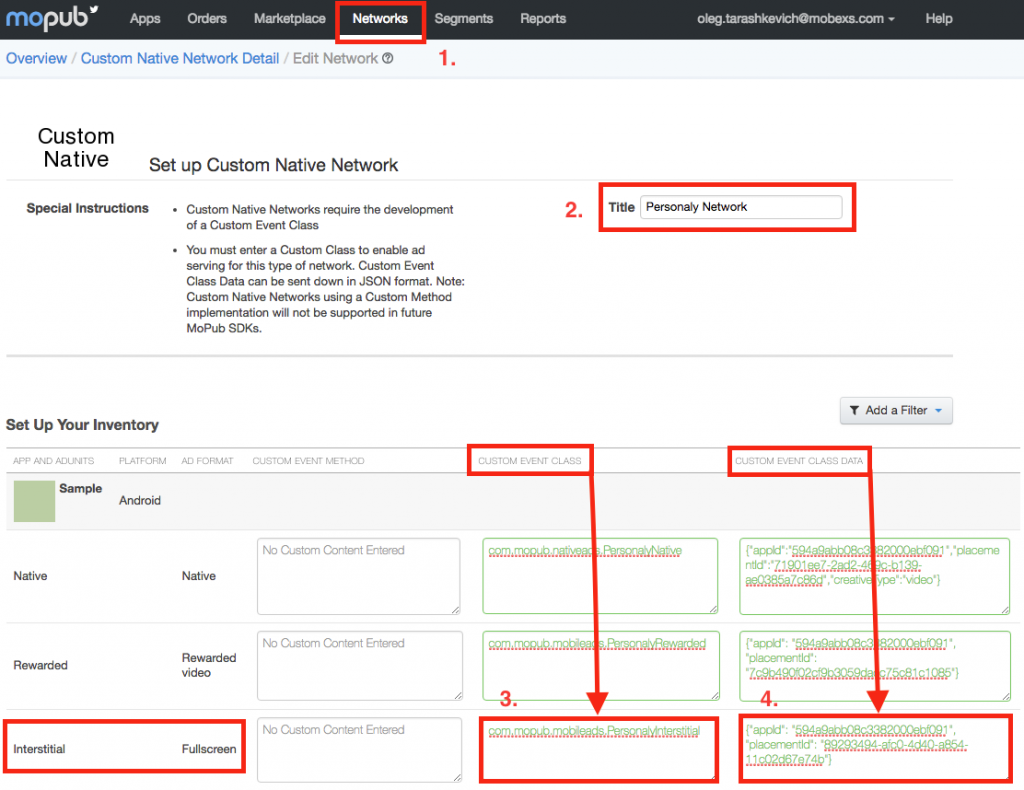
Custom Event Class: com.mopub.mobileads.PersonalyRewarded
Custom Event Class Data: {"appId": "APP_ID", "placementId": "REWARDED_PLACEMENT_ID"}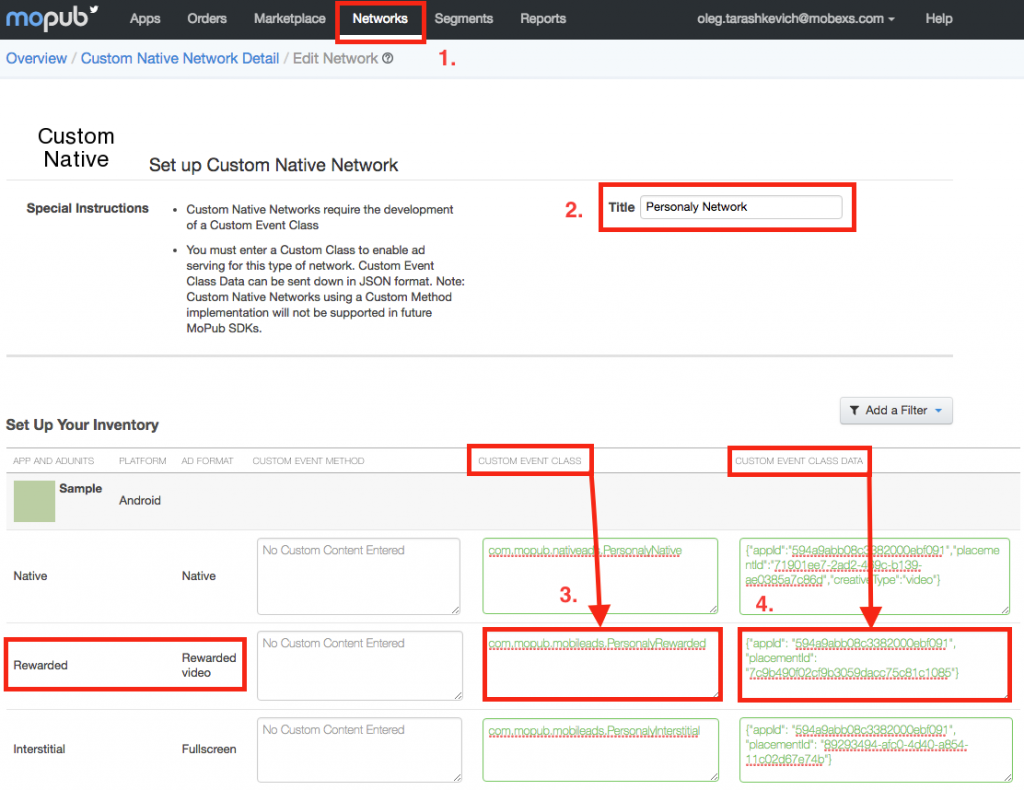
Custom Event Class: com.mopub.nativeads.PersonalyNative
Custom Event Class Data: {"appId": "APP_ID", "placementId": "NATIVE_PLACEMENT_ID","creativeType":"video"}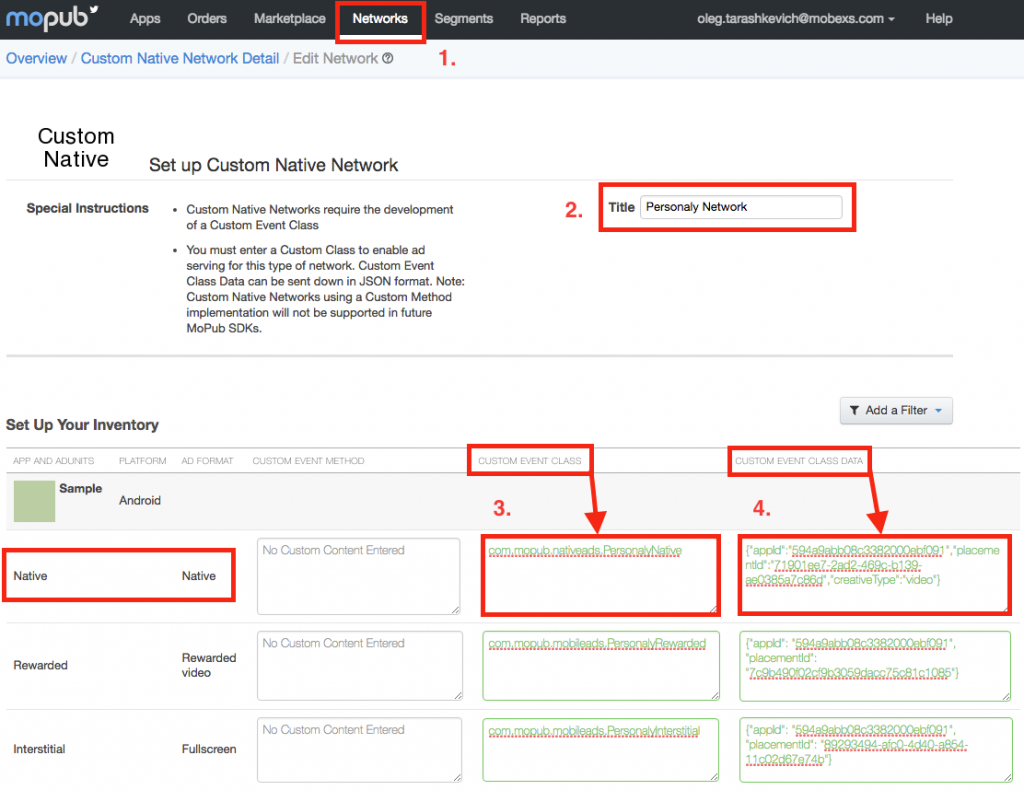
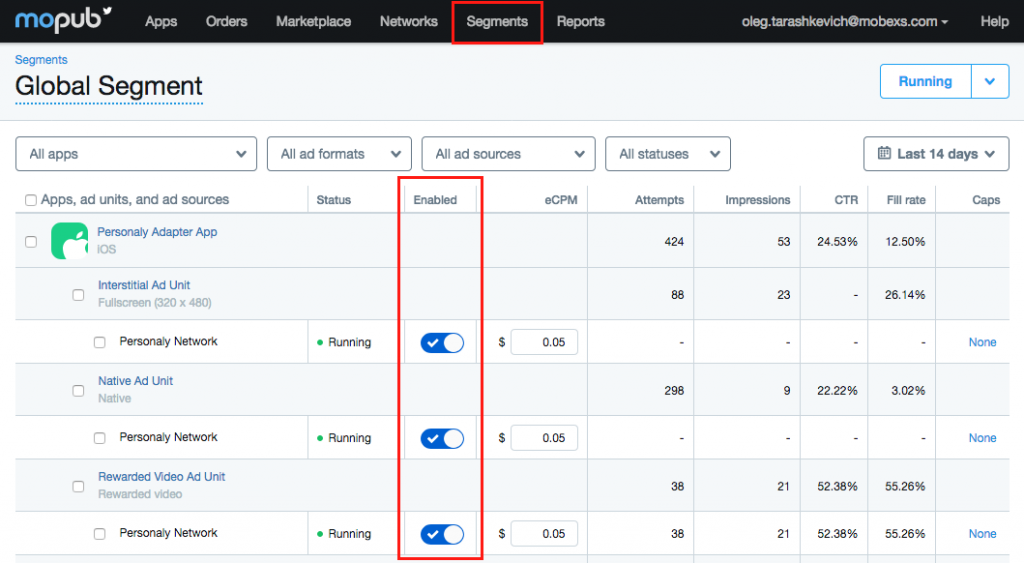
- Navigate to the Segments page and choose your segment, then enable the Ad Network for the Ad Unit.
e. Using native ads
In order to display native ads, you are required to set up the MoPub Native Ad Renderer Configuration as follows:
// Setup view ids for Personaly
PersonalyExtras extras = PersonalyExtras.create()
         // Note that MediaView is mandatory for use
        .mediaView(R.id.pn_media_view)
        .appDeveloperId(R.id.pn_app_developer)
        .ratingBarId(R.id.pn_rating_bar)
        .reviewsId(R.id.pn_reviews);

// Setup view ids for MoPub
ViewBinder personalyBinder = new ViewBinder.Builder(R.layout.pn_ad_view_layout)
        .titleId(R.id.pn_title)
        .textId(R.id.pn_description)
        .iconImageId(R.id.pn_icon)
        .callToActionId(R.id.pn_button)
        .addExtras(extras)
        .build();

// Optional configuration for NativeAdView
NativeAdConfig config = NativeAdConfig.create()
        .setCreativeType(CreativeType.ALL)
        .setVideoLooping(true)
        .setVideoMuted(false);

final PersonalyAdRenderer personalyRenderer = new PersonalyAdRenderer(personalyBinder, config);
10. AdMob Mediation
This section describes how to serve Persona.ly’s ad units (rewarded video/playable, interstitial video/playable, and native ads) using AdMob’s mediation network.
a. Prerequisites
Before you start working with the AdMob adapter, please make sure that the Persona.ly SDK is integrated and initialized as described here. You should also integrate the AdMob SDK as described here.
The Persona.ly mediation adapter for AdMob supports the following ad units:
- Interstitial
- Rewarded video
b. Integration
Add dependency from remote or local binaries and build the project.
Remote
Add the following lines to build.gradle of your app and build the project:
repositories {
    maven { url 'https://dl.bintray.com/personaly/maven' }
}

dependencies {
    compile 'ly.persona.sdk:mediation_admob:1.0.621@aar'
}
Local
- Download the PersonalyAdMob.aar by clicking here.
- Add the PersonalyAdMob.aar file to the libs folder of the application.
- Add the following lines to build.gradle of your app and build the project:
allprojects {
    repositories {
        jcenter()
        flatDir {
            dirs 'libs'
        }
    }
}

dependencies {
    compile(name: 'PersonalyAdMob', ext: 'aar') }
c. Setting up
- Sign in to your AdMob account.
- Choose an application to configure mediation for.
- Create a new Ad Unit.
- Navigate to the Mediation section.
- Create a new mediation group:
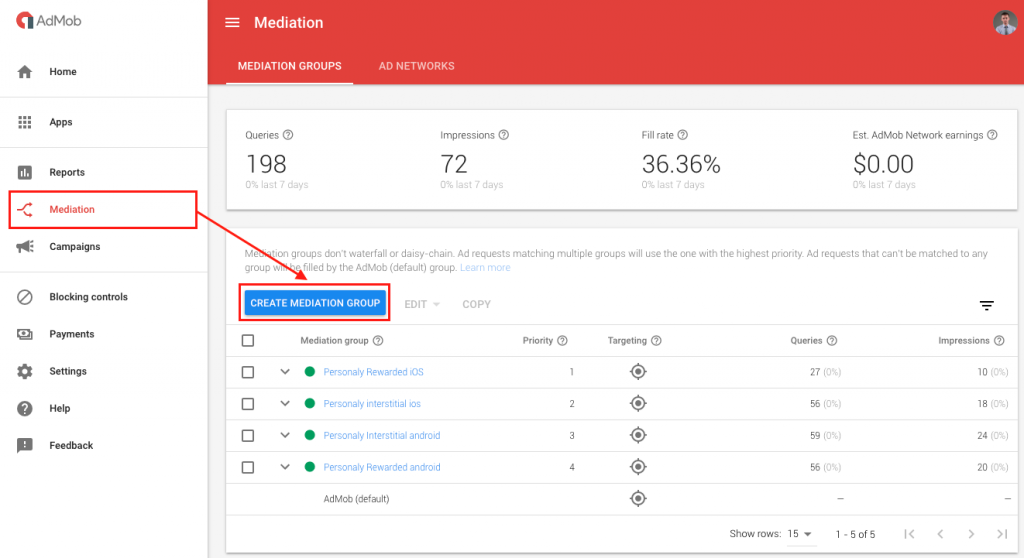
- Choose an Interstitial or Rewarded video ad format.
- Add the ad units.
- Add a new Custom Event.
- Set the Class Name and a Parameter:
- Interstitial
- Rewarded video
Class Name:com.google.ads.mediation.personaly.PersonalyInterstitial
Parameter: {"appId": "APP_ID", "placementId": "INTERSTITIAL_PLACEMENT_ID"}
Class Name:com.google.ads.mediation.personaly.PersonalyRewarded
Parameter: {"appId": "APP_ID", "placementId": "REWARDED_PLACEMENT_ID"}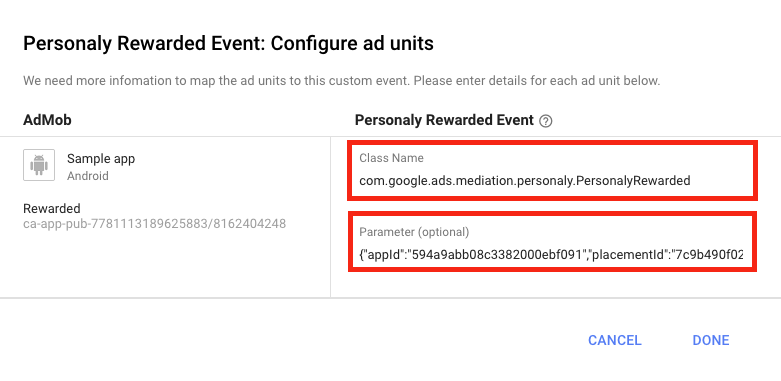
- Save all the changes.
- Use the following code to build the request:
- Interstitial
- Rewarded video
// Create a request with PersonalyInterstitial.class
AdRequest request = new AdRequest.Builder()
        .addCustomEventExtrasBundle(PersonalyInterstitial.class, null)
        .build();

// Load the ad
InterstitialAd interstitialAd = new InterstitialAd(this);
interstitialAd.setAdUnitId("AdMobAdUnitId");
interstitialAd.loadAd(request);
// Create request with PersonalyRewarded.class AdRequest request = new AdRequest.Builder() .addNetworkExtrasBundle(PersonalyRewarded.class, null) .build(); // Load the ad RewardedVideoAd rewardedVideoAd = MobileAds.getRewardedVideoAdInstance(this); rewardedVideoAd.loadAd("AdMobAdUnitId", request);You can find more details about the AdMob integration for Rewarded video here and Interstitial here.
11. Custom Server Parameter
SDK supports custom server parameter for server-to-server callbacks. Developer has to create object of class Map<String, String> and set params value. Please use clickId or Field.CLICK_ID as a key for value and put it to the map.
Map<String, String> params = new HashMap<>();
params.put("clickId", "value");
Rewarded ad:
CampaignAd.get(REWARDED_PLACEMENT_ID)
        .setServerParams(params);
Interstitial ad:
CampaignAd.get(INTERSTITIAL_PLACEMENT_ID)
        .setServerParams(params);
Rewarded Pop-up ad:
PopupOfferAd.get(POPUP_OFFER_PLACEMENT_ID)
        .setServerParams(params);
App Wall ad:
AppWallAd.get(APP_WALL_PLACEMENT_ID)
        .setServerParams(params);
Native Ad:
NativeAd.get(NATIVE_PLACEMENT_ID)
        .setServerParams(params);
Offer Wall ad:
For Offer Wall ad unit use Field.PUB_CLICK_ID or “pub_click_id” as a key:
Map<String, String> params = new HashMap<>();
params.put(Field.PUB_CLICK_ID, "value");

OfferWallAd.get(OFFER_WALL_PLACEMENT_ID)
        .setServerParams(params);
In Offer Wall the parameter’s value is limited up to 32 characters
AdMob
Rewarded
In order to pass it through AdMob developer has to create object of class Bundle and put params value. Please use Field.CLICK_ID or “clickId” as a key for value and put it to the map.
Follow AdMob guide to pass custom server parameter to Personaly SDK:
final Map<String, Object> params = new HashMap<>();
params.put(Field.CLICK_ID,  "server parameter");

MoPubInterstitial ad = new MoPubInterstitial(this, "ad_unit_id");
ad.setLocalExtras(params);

// Create a request with PersonalyRewarded.class
Bundle bundle = new Bundle();
bundle.putString(Field.CLICK_ID, "server parameter");

AdRequest request = new AdRequest.Builder()
       .addNetworkExtrasBundle(PersonalyRewarded.class, bundle)
       .build();
Interstitial
In order to pass it through AdMob developer has to create object of class Bundle and put params value. Please use Field.CLICK_ID or “clickId” as a key for value and put it to the map.
Follow AdMob guide to pass custom server parameter to Personaly SDK:
// Create a request with PersonalyInterstitial.class
Bundle bundle = new Bundle();
bundle.putString(Field.CLICK_ID, "server parameter");

AdRequest request = new AdRequest.Builder()
       .addCustomEventExtrasBundle(PersonalyInterstitial.class, bundle)
       .build();
MoPub
Rewarded
In order to pass it through MopPub developer has to create object of class PersonalyMediationSettings and set params value. Then pass it to static method initializeRewardedVideo.
List<Class<? extends CustomEventRewardedVideo>> classes = new LinkedList<>();
classes.add(CustomEventRewardedVideo.class);

// Pass Server Params
PersonalyMediationSettings settings = new PersonalyMediationSettings("server parameter");
MoPubRewardedVideos.initializeRewardedVideo(this, classes, settings);
Interstitial
In order to pass it through MopPub developer has to create object of class Map<String, Object> and set params value. Please use Field.CLICK_ID or “clickId” as a key for value and put it to the map.
final Map<String, Object> params = new HashMap<>();
params.put(Field.CLICK_ID,  "server parameter");

MoPubInterstitial ad = new MoPubInterstitial(this, "ad_unit_id");
ad.setLocalExtras(params);
Native
In order to pass it through MopPub developer has to create object of class Map<String, Object> and set params value. Please use Field.CLICK_ID or “clickId” as a key for value and put it to the map.
MoPubNative ad = new MoPubNative(this, "mopub_ad_unit_id", moPubNativeListener);

final Map<String, Object> params = new HashMap<>();
params.put(Field.CLICK_ID, "server parameter");
ad.setLocalExtras(params);